SHAD 2020 Design Project
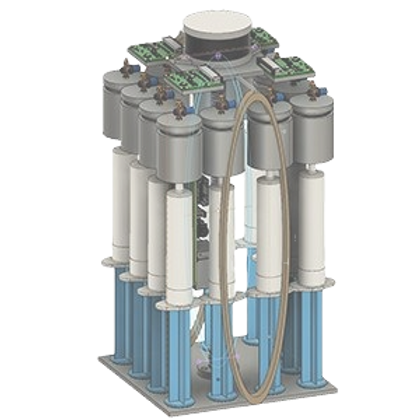
Hoping to gain results as to how different pill capsules would behave in astronauts we designed this chamber to be sent into space. Conceptualized and designed in a team of 12 people, over 1 month, we worked together to develop the chamber as well as the experiment that will happen within.

General Overview
This project originates from the SHAD 2020 Term Design project. During this 1 month's term, we were tasked with designing an experiment that would work within a microgravity environment.
Steps Of Development
Experiment Brainstorming
During the initial development phase, our team brainstormed ideas for an experiment within a confined microgravity chamber. We collaborated to leverage the unique environment, discussing how reduced gravity could impact fluid dynamics and biological behaviour. After thorough discussions, simulations, and evaluations, we refined our concepts and settled on a design to study organic solubility behaviour in weightlessness. This brainstorming phase was pivotal, guiding us toward a meticulously planned and collaborative final experiment.
Chamber Design
- What I worked on
In designing the solubility experiment chamber, we opted for a meticulous approach to ensure accuracy and transparency. The heart of the setup involves utilizing syringes to introduce precise amounts of substances into a transparent chamber. This chamber, crafted from clear acrylic, not only allows easy observation but also maintains controlled conditions. Above the chamber, strategically positioned cameras provide a bird's-eye view of the experiment, enabling real-time monitoring and data collection.
Final Touches
During the final stages of development, we refined our solubility experiment setup to ensure its functionality. One crucial modification involved incorporating an air valve within the chamber. This adjustment addressed the issue of trapped gas within the pods, providing a means for its release. Additionally, we anticipated potential power limitations with the motor that drives the syringes. To counter this, we introduced elastic assistance to the syringe mechanism, guaranteeing smooth and consistent upward movement. These nuanced final touches not only optimized the experiment's accuracy but also underscored our commitment to a robust and reliable scientific setup.

Design Overview
Extrusion Mechanism
The design features a stepper-driven system working alongside a threaded rod to achieve controlled vertical movement of the base plate. The idea was sparked by the innovative mechanics of 3D printers, which transform rotational energy into precise linear motion. Taking inspiration from this, we applied a similar principle to our design, allowing the motor to drive the threaded rod, consequently raising or lowering the plate as needed. This arrangement ensures reliable and accurate vertical displacement, tailored to our specific requirements.
Pill Housing
Displayed here, is the transparent chamber in which the pills will be placed. There were two factors fo consideration taken into account during the design process. Watertightness and Air Escapability. Crafting a watertight design for the transparent chamber was a paramount consideration in our experiment's construction. Any chance of a leak would render out data unfit as it could result in false measurements. Moreover, recognizing the potential challenge of trapped air affecting our experiment's outcomes, we implemented an ingenious air removal valve. This valve enables us to purge any residual air from the chamber while introducing the solvent..
Data Gathering
While we planned for the data to be gathered post-space flight, we also included 4 bird-eye cameras to record as the experiment proceeds so that we have vision of the experiment as it proceeds. The four cameras are all connected to a Raspberry Pi 3, which will also control the overall logic of the experiment.


Logic Design
This experiment was expected to be launched as a payload placed within a rocket. Due to these factors, our logic was designed to work alongside gravity.
1 / Entering MicroGravity
As the payload enters the microgravity environment, we expect our included accelerometer to stop functioning as expected. We will be using this as a notification that we have entered a reduced gravity environment. We will then activate the code, starting the entire process
2 / In Microgravity
While in microgravity, we expect the cameras to turn on prior to the accuation of motor as to capture the entirety of the experiment.
3 / Exiting Microgravity
As the Accelerometer starts to return expected values, we can understand that the payload is re-enetering the earth's gravitational pull. This is the notificiation as to when the experiment is finished. Here we stop the camera's as well as start to save all gathered data multiple times to ensure video safety.